
Etsy sellers need to think dynamically about how to make
their Etsy Squares stand out from the pack.
In essence, you need to brand your Etsy Squares, so the buyer knows it is your Etsy shop and your Etsy item just by glancing quickly at the square.
And when we say brand, we don't mean to just put big words "My Shop Name Here" in your square, but to visually brand your images. Make them work for you 110%.
Our steps will hopefully help you accomplish this goal.
If you want to research this more, you can probably search for ways to maximize your Etsy 'thumbnail.' We like saying "Etsy Squares" though, so we are going with that. ;-)

Hola!
In Step #5 we started posting pictures on an Etsy listing,
pretending to sell Needa's outfit.
We played around with a cropped and un-cropped image and edited our Etsy Square.

We played around with a cropped and un-cropped image and edited our Etsy Square.

For this step we'll look at more pics and how they work as Etsy Squares.
WARNING: This is a long, long, long post with lots of pics.
1) Think About How You Will Use Your Pics in the Footure
When setting your camera make sure it is on at least a Large capture setting.
That is in your normal menu choices -- we have our camera set on "L" for Large
with a 15 MB 4752 x 3158 pixel pic.
Yes, that is a large picture.
But that allows us to crop and edit our pictures as much as
one human could possibly want.
This setting is particularly useful if you noticed you never took a shot of your doll's pants/shoes/sleeve, etc.
Your "L" images should allow you to crop an image down to just shoes and not lose quality.
2) Edit Your Pics
Which means adjusting their exposure and boosting their levels, which we do in Picmonkey.
And possibly cropping some images.
Before Editing


After Editing


Before Editing


After Editing

Edit. Edit. Edit.
3) Choose 5 Pics With A Lot of Info for Your Listing
Artsy Angle = Not Enough Info


If you want to include Artsy Angles, be sure to include at least one photo like the example below. It offers a lot of info for the potential buyer.

Again, you want to "convey the shape, size, color, and texture.
Try to use natural light and include a great close-up."
Shape and Fit
Size, Color, Texture
Natural Light
A Great Close-Up
Those phrases should be running through your mind as you photograph your items.
Those phrases should be running through your mind as you photograph your items.
4) Using Pics with Dynamic Poses
One of the reasons we chose Needa's forest photo shoot for these examples was that we knew we had taken pics of her in a variety of poses.
During this process we weren't photographing to sell, we were just photographing for kicks.
But that doesn't mean we can't use these pics in a listing.
You can make it work.
Dynamic posing helps the potential buyer imagine it on their doll, in their photo shoots, and Youtube videos.
Now we start playing around with our images, seeing how they will look in a listing...

Here are some examples of "dynamic pose" pics being used as the Etsy Square:
Artsy Angle #1
A beautiful photo but....


A Bit Too Zoomed-In:

Better:


Etsy's Automatic Square:


Let's Try Editing:


Now we start playing around with our images, seeing how they will look in a listing...

Here are some examples of "dynamic pose" pics being used as the Etsy Square:
Artsy Angle #1
A beautiful photo but....
Do you want it as your first image in your Etsy listing?

It may give your viewer vertigo, haha.

Square is pretty, but ultimately awkward.
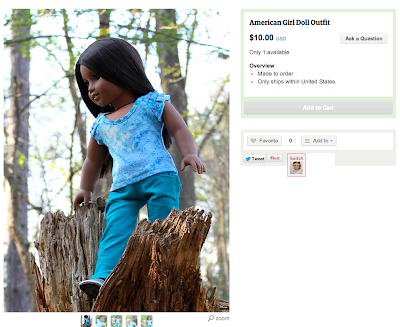
Let's try zooming in:
Better, but still awkward.
Artsy Angle #2
Unique, but uncomfortable visually.

You don't want your viewer's eyes to be wondering
which way is up and which way is down.
A Great Close-Up

It looks great as the Square, but do you want it as your first image in your listing?
It doesn't quite give enough info about your product.
Here it looks like you are trying to sell the doll:

Etsy's Automatic Square placement:
Here we edited it to our preferred placement.
The Too-Far Away Shot
This is an amazing image, if we don't say so ourselves...
Okay, it's mostly Mother Nature that makes this look so cool.

But it really is too far away.
Don't get too caught up in capturing the forest, your backyard, your garden, a fountain,
whatevs is around your doll.

While the tree roots against the rock wall look cool,
they aren't going to help you sell your product.
Yes, this is an extreme example, haha.
But we are trying to make a point. ;-)
Remember what you are trying to sell.
The Grassy Knoll
We would only use these shots IN ADDITION to a standing,
full, frontal shot of the whole outfit we are selling.
But they offer up some very nice Squares.
And they don't look bad as your first image in your listing.

But we aren't a big fan of the Etsy Square here:
Which looks like this:
So we edit the Square:
After zooming in and out and dragging the image around,
we landed on this one for our Square:
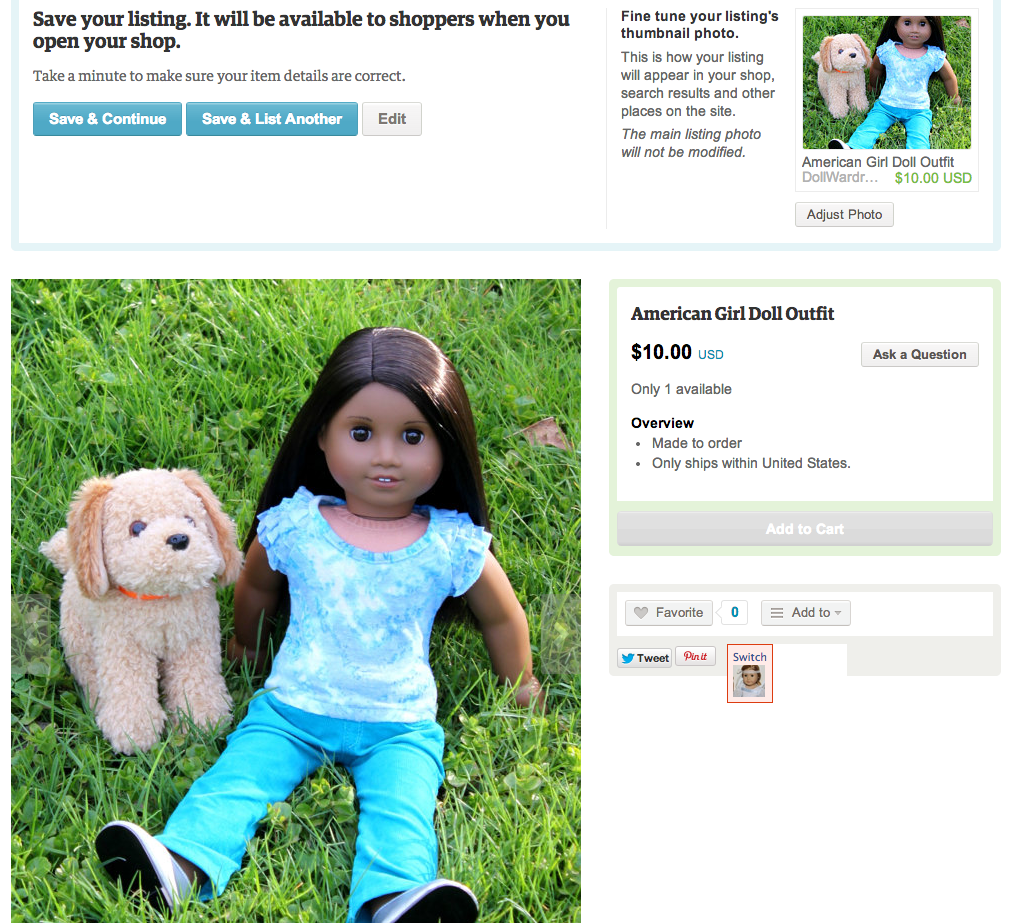
Another Grassy Knoll Pic

As the first image in our listing:

But this Square kinda makes the potential buyer think that
the doggie is included in the sale:
So we'll want to edit that Square:
So here we have a great close-up in the Square,
but yet a much bigger image as that first image in the listing:

Which is what we are trying to pitch to you sellers as
one of the best routes you can use for your listings.
Grassy Knoll Again

This is a great first image option if you are only selling the t-shirt.

The Square, but once again, is the doggie included?
No, the doggie isn't included.
So we'll have to edit the Square, which proves difficult:
This looks good, but again, the doggie is shouting "I'm for sale!"
So if you want to try an image like this, leave the doggie out of it. ;-)
Grassy Knoll From Above
Again, I'd only use these pics as your first listing images
if you are just selling the t-shirt.

Cropped


Etsy's Automatic Square:
Our Edited Square:
Final Grassy Knoll Pic

As the first image in our listing:

Good for selling the t-shirt,
but does suggest visually that the doggie is included in the listing:

Etsy's Automatic Square:
Let's Edit This.
Better:
On a Blasted Tree
Here you have an example of a blurred-out background that has been accomplished with the camera and without editing software.

You may notice that the tone of the outfit is more purpley here than in our other pics.
This is because it was taken at dusk.
Make sure that your Etsy images are as close as possible to the
actual colors of the outfit.
Because this image is not "color-correct" per se,
we wouldn't use it in a real listing.
However, for our purposes here it provides a blurred-put background and a unique dynamic pose.
Let's try to use it as our listing's first image:

It provides a pretty fascinating intro pic.
But it does not satisfy the full, frontal, straight-on shot of the whole outfit.
So we'll have to make sure to include one of those as another pic.

Etsy's Automatic Square:
Our Edited Square:
As the listing, again we see a zoomed-in Square but a much larger image in the listing.

This picture offers a good example of how to photograph your separates,
which we will talk about more in the next Step post.
We wouldn't use this as our Square if we were trying to sell these pants because of the wrinkling of the pants as Needa leans forward.
But besides that, it is the type of image we would use to sell pants because:
1) We can see the American Girl hand clearly,
telling us visually that this listing is for AGs.
and
2) The background is blurred out.
Mon Chat Dans La Lune does this blurring for all of her separates listings:

Personally we'd keep the doll face in the Square for a top, but as far as skirts and shorts listings, these are great examples to follow.
A blurred-out background really makes an item pop,
and we'll talk more about this in Step #7.
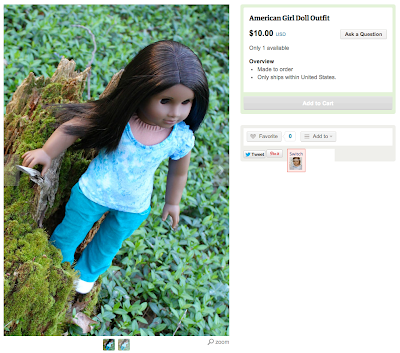
Moss, Anyone?
Here we have an easy, breezy natural pose.
As the first image in the listing:

____________

Etsy's Automatic Square:
Don't Do This. Headless Dolls Annoy Us.
It's not the French Revolution, people. ;-)
Let's Edit This Square:
Zoom In Peeps:
Nice.
Artsy Angle #3
This particular type of angle does not give the viewer vertigo, but is still artsy.

As the first image in your listing:

___________

Etsy's Automatic Square:
Let's Try Editing:
A Very Sweet Square:
Okay, that's all for Step #6.
Hopefully we started your gears turning as far as:
1) Ideas on how to dynamically pose your dolls,
particularly for outdoor photo shoots.
2) Ideas for how to use an image with a lot of information
as your first image in your listing,
but still make the Etsy Square for that
same image eye-catching to a potential buyer.
Please let us know if you have any questions!
________________________
Up next in Step #7 we'll discuss how to craft Etsy Squares for "separates" listings -- such as listings for pants, shorts, tops, and accessories.
We have several more steps for how to Brand Your Etsy Squares to help you learn more about what types of squares we tend to click on and how to make them yourself.
So Stay Tuned!!!
___________________
If you have any questions or comments, feel free to let us know!!!
We have had a couple requests to "critique someone's squares" --
so we will offer this service to you completely free.
But it does mean we'll post about it on here, haha.
That way our advice can help as many people as possible.
Even the shy peeps who don't ask us to critique their squares. ;-)
So if you want your squares critiqued,
comment below or email us at nora.demington@gmail.com.
When we are able to, we'll post about your squares and our advice and examples on how to improve them.
(Which will be soonish.)
3 comments:
LOVEEEE the picture where she's sitting on the moss! That's gorgeous!! You use Picmonkey to edit your pics, right? (P.S: the is "American Girl Photography" from facebook.. :p )
This is a great series and I love how detailed you are being. One comment I would make though is that colours can vary slightly from monitor to monitor so even though you try to get your colours as close to reality as possible, others may still see them slightly differently.
Yes -- We use PicMonkey to edit our pics. :-)
Post a Comment